Insulating Your Basement The Right Way: Materials, R‑Values, And Mistakes To Avoid

Cold floors and musty odours come down to two root causes: bare concrete that conducts heat and moisture that isn’t controlled. The fix is simple: install a continuous thermal break on concrete, air‑seal and insulate the rim joist, and choose an R‑value (RSI) package that matches Ontario’s compliance path so you pass inspection before drywall. We’ll show where to insulate, which materials perform, how R‑values are selected, and the mistakes that create mould and callbacks.
If you want this handled end‑to‑end and you’re located in the Greater Toronto Area, check out our basement renovation services. We plan assemblies, carry permits, schedule inspections, and deliver a code‑clean finish.
What “Right” Means In Ontario: Code Context And Effective R‑Values
In Ontario, “right” means warm, dry, and compliant. Basements are measured against the Ontario Building Code’s energy efficiency paths (SB‑12 for Part 9 houses). Designers document the chosen path using the Energy Efficiency Design Summary (EEDS) forms. Those forms capture your assembly R/RSI so plans and inspections line up. You don’t need to memorize numbers; you need a design that can be inspected and approved.
“Nominal R” is what’s printed on a batt. “Effective R” is what the whole assembly delivers after thermal bridges and framing are considered. Inspectors look for compliance with the documented package, not rule‑of‑thumb claims. That’s why we match assemblies to the EEDS form at design, then stage work so the insulation is visible when the City comes.
R‑Value Vs. RSI Vs. Effective R
R‑value is the imperial measure of thermal resistance; RSI is the metric equivalent. Effective R is the net performance of the whole wall after studs, gaps, and thermal bridges. In practice, your designer picks a package (prescriptive or performance) and records the required R/RSI on the City’s EEDS. That package governs material choice and thickness so your project passes review and inspection.
Where To Insulate: The Four High‑Impact Areas

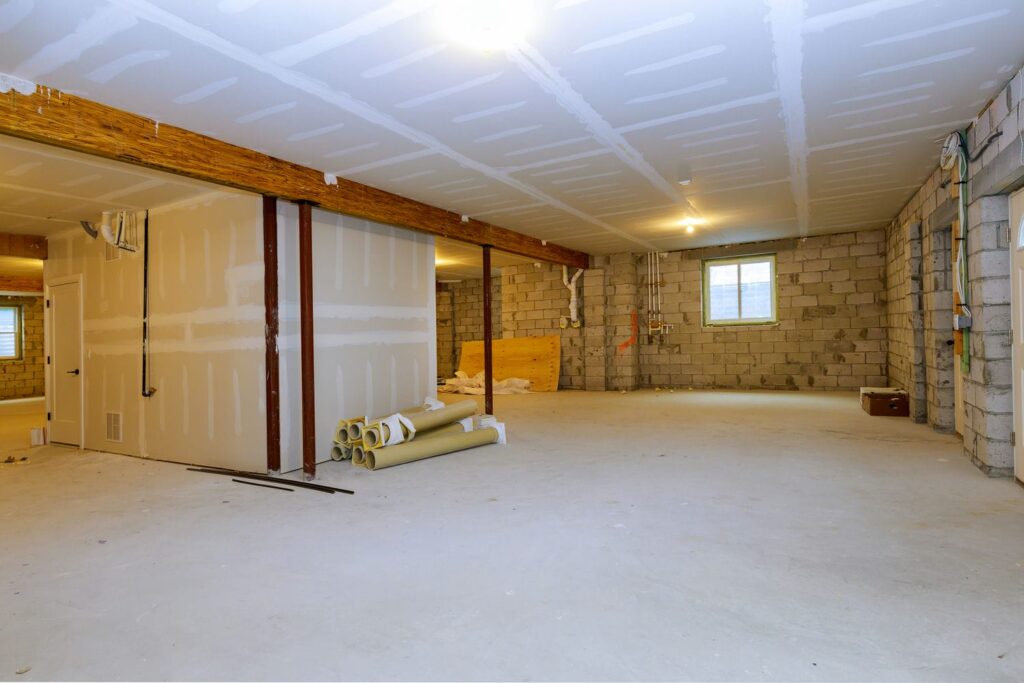
Start where heat and moisture move most: concrete foundation walls, rim joists/band boards, slab and its perimeter, and bulkheads/headers/penetrations. Getting these four right solves 80% of comfort complaints and protects finishes.
Concrete Foundation Walls (Thermal Break Comes First)
Concrete is a highway for heat loss and a condensing surface when warm indoor air meets cold mass. The baseline is a continuous foam or spray‑foam layer directly against concrete, which stops cold transfer and surface condensation. Once the thermal break is in place, you can frame and, if needed, add batt or mineral wool in the stud space. Skipping the foam and putting batts directly on concrete is the classic failure that leads to smell and stains.
Rim Joists And Band Boards (Air‑Seal, Then Insulate)
At the rim, air leakage often matters more than R‑value. Seal every gap first, then insulate. For most homes, closed‑cell spray foam in the rim bays is the simplest way to get both an air‑seal and thermal resistance; a cut‑and‑cobble rigid foam solution also works if edges are sealed. This detail carries outsized comfort benefits because it kills cold drafts at the floor line.
Slab And Perimeter (Comfort And Moisture Control)
If you’re replacing or leveling a slab, add foam under or over it per the design package. Even where foam under the slab isn’t feasible, perimeter detailing around walls and new walkouts can improve comfort.
Bulkheads, Headers, And Penetrations (Thermal Bridges)
Beams, ducts, and service chases break your thermal plane. The goal is to maintain continuity: extend foam behind and around obstructions, seal penetrations, and avoid uninsulated metal or wood bridges to the concrete. This is a coordination task between design and site crew that pays off in even temperatures.
Material Options: What Works Below Grade (And Why)

Basements demand moisture‑tolerant materials and a continuous thermal break on concrete. Here are four reliable assemblies we use in the GTA.
Rigid Foam + Stud Wall (EPS/XPS + Mineral Wool Or Batt)
Rigid foam against concrete provides the thermal break, then a stud wall adds services and optional cavity insulation. It balances cost, durability, and future access. Watch thickness where headroom is tight; sometimes a thinner foam plus mineral wool is the best fit. For layout planning when space is tight, see our post on increasing your basement ceiling height.
Closed‑Cell Spray Foam (Full Height Or Hybrid)
Closed‑cell spray foam excels on irregular walls and complex junctions. It delivers air‑seal and R‑value in one step and handles minor surface undulations. Cons: higher cost and the need for careful masking and inspection timing. We often combine spray foam at the rim with rigid sheets on flat runs for budget control.
Mineral Wool In Studs Over A Foam Thermal Break
Mineral wool is hydrophobic, fire‑resistant, and helpful for sound control. Over a foam thermal break, it boosts effective R without adding moisture risk. The key is foam first; mineral wool alone against concrete leaves the condensation surface inside your wall.
ICF Or Exterior Insulation (When Wall Work Is Major)
If your project includes a new walkout or major wall work, ICF or exterior insulation may be efficient long‑term. This shifts sequencing and inspection, so it must be designed into the permit set and calendars early. For permit effects and scheduling, see our post on permits for basement renovations.
R‑Values For GTA Basements: How Designers Pick The Package
There isn’t a single magic R‑value. Ontario uses prescriptive packages or performance modeling under SB‑12, recorded on the City’s EEDS forms. Your designer selects a package that balances wall R/RSI, windows, mechanicals, and airtightness, then lists those values on the EEDS so plans, site work, and inspections all agree. That’s the document inspectors will check against.
Insulation gets inspected before concealment. Toronto requires you to notify the inspector when the project is ready for each mandatory inspection, with stamped permit plans on site and the assembly fully visible. If you cover work early, you may have to open it back up. Build the insulation inspection into your schedule to avoid costly rework.
Moisture And Vapour Control: Get The Layering Right
Confusion between vapour barriers (poly) and vapour retarders (smart membranes) is a common source of failures. In a foam‑first basement assembly, poly is often unnecessary and can trap moisture if placed incorrectly. The sequence is simple: air‑seal first, install the thermal break, then add cavity insulation and finishes. Keep the assembly consistent with your EEDS and you’ll pass both energy and moisture criteria cleanly.
Air leaks at the rim joist and around service penetrations carry moisture into cold cavities. Seal those paths with closed‑cell foam or properly edged rigid foam and tapes before you insulate the fields. This small step drives comfort, protects finishes, and reduces drafts.
Common Mistakes To Avoid (And What We Do Instead)

Most basement failures stem from skipping the thermal break or trapping moisture. Here are four preventable pitfalls.
Batts Against Bare Concrete
Batt insulation needs a warm, dry cavity. Pressing it to concrete puts fibre against a condensing surface. The result is musty odours and dark staining. Do this instead: install a foam thermal break on concrete first, then frame and add batt or mineral wool in the stud space if needed.
Poly In The Wrong Place
Poly is not a universal fix. In hybrid foam‑plus‑stud assemblies, interior poly can trap moisture. Do this instead: use the foam as your vapour control and, where required, specify a smart retarder that’s compatible with the EEDS package.
Ignoring The Rim Joist
Leaving the rim unsealed ensures cold drafts, higher bills, and comfort complaints. Do this instead: air‑seal first, then insulate the rim with closed‑cell spray foam or sealed rigid blocks.
Covering Insulation Before Inspection
Closing walls early leads to re‑opening and delays. Do this instead: schedule the insulation inspection and keep assemblies visible with stamped plans on site. For example, Toronto is explicit that covered elements must be uncovered for inspection.
Cost And Timeline Factors You Should Plan For
Three drivers set cost and pace: headroom, material choice, and inspection cadence. Foam thickness and furring can steal precious centimetres; where ceilings are tight, get creative with duct routing or low‑profile assemblies. Material selection matters too: spray foam simplifies complex areas but costs more; rigid‑plus‑studs are budget‑friendly but require precise detailing.
Inspections, not just labour, govern the calendar. Toronto sets expectations for booking and visibility; plan float between framing, insulation, and close‑up so you don’t paint yourself into a corner.
When adding bedrooms or enlarging windows, thermal detailing must integrate with egress and structural changes. Coordinate insulation around openings to keep your thermal plane continuous.
At‑A‑Glance Table: Assemblies, Effective R, Moisture Risk, And Headroom Impact
| Assembly | Strengths | Watch-Outs / When To Use |
| Foam (1–2 in) on Concrete + Studs + Mineral Wool | Continuous thermal break; good moisture profile; easy services in studs; solid comfort | Takes a bit of headroom; size foam to meet your SB-12/EEDS package; detail seams well |
| Full-Height Closed-Cell Spray Foam | Air-seal + insulation in one; handles irregular walls and transitions; minimal headroom loss | Higher cost; protect adjacent finishes; plan inspection timing before concealment |
| Studs + Batts (No Foam) — Not Recommended | Low material cost; minimal thickness | No thermal break; high condensation risk on concrete; typically fails comfort/durability goals |
*Final R/RSI must be selected and documented on the Energy Efficiency Design Summary that accompanies your permit drawings.
Step‑By‑Step: A Clean Sequence To Insulate A Basement
1) Diagnose Moisture And Pick The Thermal Break. Confirm the condition of concrete and select foam thickness or spray foam strategy that fits headroom and budget.
2) Choose The SB‑12 Compliance Path And Complete The EEDS. The prescriptive or performance path determines the package values that appear on your drawings.
3) Apply For Permits If Your Scope Triggers Them. Many basement projects do; build insulation inspection into the schedule before drywall.
4) Air‑Seal Rim Joists And Penetrations. Stop air movement first so your insulation works.
5) Install The Continuous Thermal Break, Then Frame. Foam against concrete first; add stud cavities and services.
6) Add Cavity Insulation And Prepare For Inspection. Keep assemblies visible and stamped plans on site. Call for inspection.
7) Close Up, Finish, And Verify Comfort. After approval, add vapour control per the design and finish surfaces.
Why Homeowners Choose Yorkland Homes
At Yorkland Homes, every project starts with planning – not guesswork. We map your insulation design to Ontario’s SB-12 energy standards, organize inspections in the right order, and keep communication open so you always know what’s next.
Since 2010, our family-owned team has delivered beautiful basement renovations that are warm, dry, and fully compliant. We’re covered by Limited Liability Insurance and back our timelines with an On-Time Money-Back Guarantee. From permits to final inspection, we handle the details so you can enjoy a finished space that feels right from day one.
FAQs
It depends on scope. Standalone insulation may not trigger a permit, but most renovations that add bedrooms, alter structure/mechanicals, or change exits do, and insulation is inspected before concealment once a permit is active. Always check your project against your City’s permit and inspection requirements.
There isn’t one best product, only best assemblies. Start with a foam thermal break against concrete, then add stud cavities with mineral wool or batt if needed. Match thickness and materials to your EEDS package and headroom constraints.
Not always. In many foam‑first assemblies, interior poly can trap moisture. The safer approach is foam for vapour control plus a smart retarder where required, consistent with your SB‑12 package.
Your designer chooses a compliance package and records the required R/RSI on the Energy Efficiency Design Summary that accompanies your permit drawings. Numbers vary by package, windows, and mechanicals.
Every city is different. For example, Toronto requires you to call for inspections at defined stages, with assemblies visible. Insulation is checked before drywall; covered work may need to be uncovered. Build those holds into your schedule.
Check out more posts below...

In-Law Suite Vs. Legal Rental In Newmarket: Which Fits?

Why Older Newmarket Basements Often Need Underpinning

What Newmarket Requires To Register A Basement Suite

Basement HVAC Basics: Return Air, Zoning, And Year-Round Comfort