Radon In Basements: Testing And Mitigation Before You Renovate

If you’re finishing a basement, test for radon first. It’s the simplest way to avoid paying twice, because mitigation is cleanest when the slab, sump, and perimeter are still accessible. If you want help planning your basement scope in the right order, our basement renovation team can build the schedule around testing, mitigation, and inspections so you don’t get stuck mid‑project.
Radon is frustrating because you can’t see it or smell it. You can’t “feel” whether a basement has it, and you can’t air it out once and move on. The only reliable approach is to test properly, interpret results calmly, and mitigate early if needed.
This guide gives you a practical playbook for GTA basements. You’ll learn what radon is, how to test the right way, what the numbers mean in Canada, and how to slot mitigation into a basement renovation without blowing up your finishes.
What Radon Is And Why Basements Are The Risk Zone
As described by the Government of Canada’s Radon guideline, Radon is a colourless, odourless radioactive gas that can build up indoors, especially in basements, and long‑term exposure increases health risk.
Basements are the risk zone because they sit closest to the soil. Radon forms naturally and can move up as “soil gas.” Your basement is the easiest place for that gas to enter and accumulate, particularly during seasons when your home is closed up.
Here’s the catch: a basement can look dry, clean, and newly renovated and still have elevated radon. Good finishes don’t tell you anything about air quality. Testing does.
How Radon Gets Into A Basement

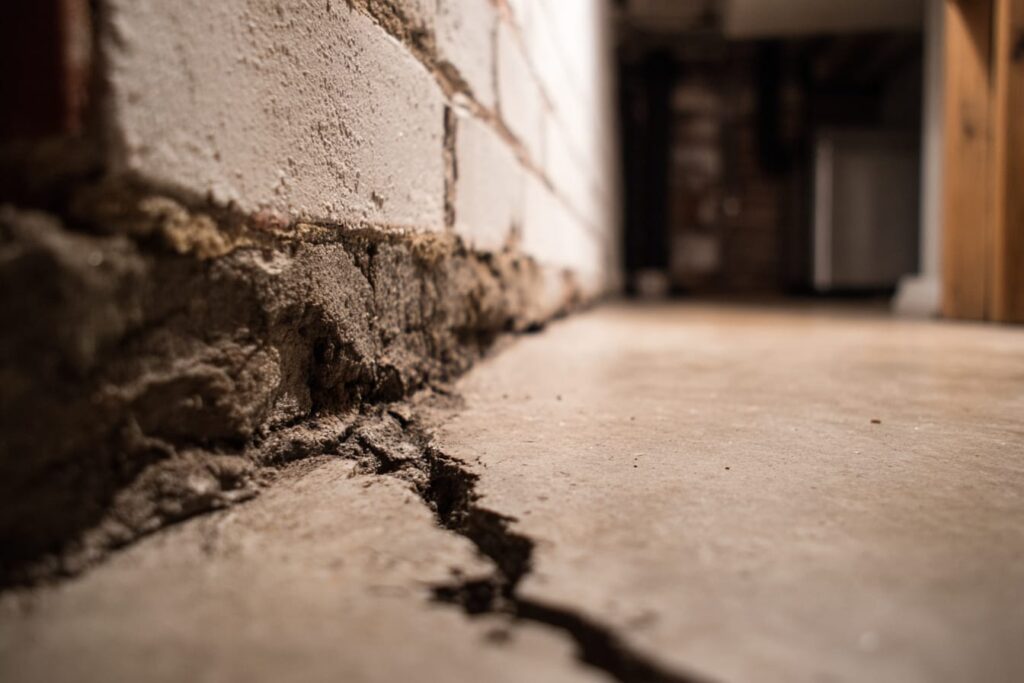
Radon typically enters through the lowest openings in the house. Think slab cracks, control joints, utility penetrations, floor drains, sump pits, and the gap where the slab meets the foundation wall. Those are normal parts of basement construction, which is why radon is a “test, don’t guess” issue.
Pressure differences do the rest. Warm air rises and leaves the house, which can pull replacement air from below. That pressure effect can draw soil gas into the basement through tiny openings that you would never notice during a renovation walk‑through.
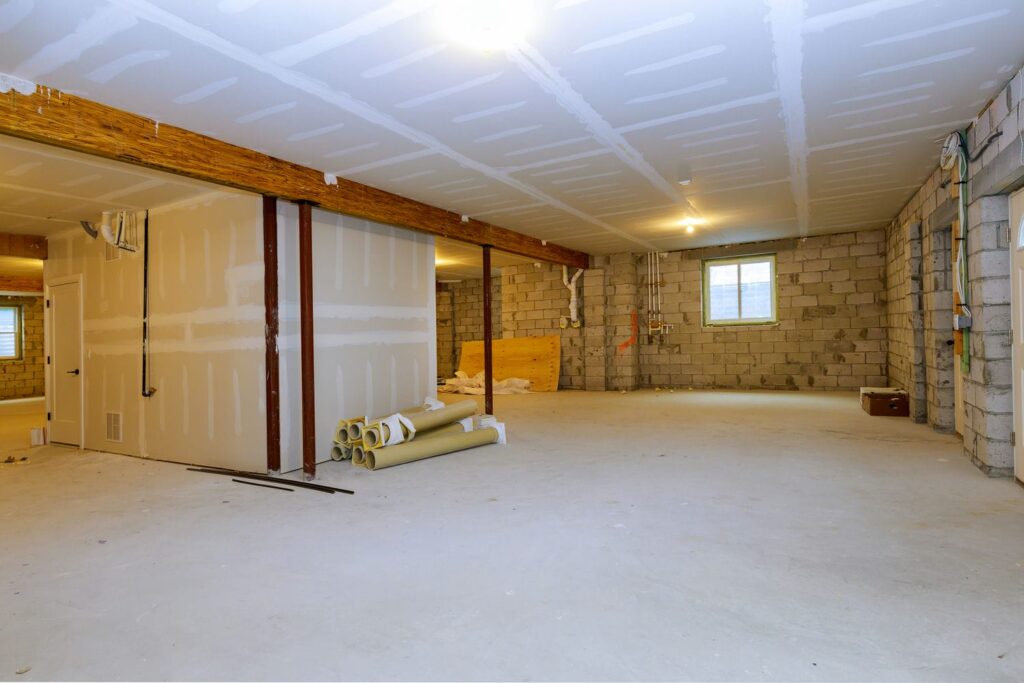
If you’re renovating, you also change the basement’s pathways. New walls, new floors, and new airtight details can hide the problem while making it harder to access later.
Why Renovations Can Change Radon Levels
Renovations can shift radon levels because they change how your basement breathes. Air sealing, new windows, added insulation, and tighter doors reduce natural leakage. That’s usually great for comfort, but it can reduce dilution air and allow radon to concentrate.
HVAC changes can also matter. New exhaust fans, duct changes, and pressure imbalances can change how air moves through the home. That’s why a “pre‑reno test” is smart, but a “post‑reno confirmation” is often smarter.
Bottom line: finishing your basement is exactly when you should treat radon as part of the plan, not a surprise.
When To Test For Radon Before A Basement Renovation
The best time to test for Radon is before you frame, before you install subfloor, and before you drywall. You want baseline information while the basement is still open and easy to modify. Health Canada recommends a long‑term test for a minimum of 3 months.
If you’re still in the planning phase, this timing also protects your design. Mitigation sometimes needs a pipe route, a fan location, and access around a sump. Those are easy to integrate early and annoying to retrofit later.
If you’ve already started renovations, don’t panic. You can still test, but you should aim to keep conditions “typical” and avoid moving the device around while the basement is being actively demolished or rebuilt.
Long-Term Vs Short-Term Tests
Long‑term tests are the standard for decision‑making because radon fluctuates daily and seasonally. Health Canada is clear: long‑term testing should run for at least 3 months.
Short‑term tests can help you screen, but they can also mislead you if you treat them as a final answer. A low short‑term number can create false confidence. A high short‑term number can cause stress that a proper long‑term average might soften.
If you’re making a renovation decision, use a long‑term test whenever you can. It gives you a stable baseline and better guidance on whether mitigation is worth doing now.
Where To Place A Radon Test In A Basement
Place the device in the lowest level of the home that is normally occupied. If you’re finishing the basement and plan to use it as living space, that usually means the basement itself. Toronto Public Health’s radon page reinforces that radon can build up indoors and that testing is the way to know your level.
Use practical placement rules. Put it at breathing height, away from exterior doors, windows, supply registers, and sump lids. Avoid placing it beside a dehumidifier or right next to a fan where airflow is unnatural.
Then leave it alone. The biggest “operator error” is moving it around because you’re curious. That turns a clean measurement into noise.
What Can Skew Your Results
Radon results can swing if you change the testing conditions. Moving the detector, placing it in a drafty corner, or testing during a period of heavy construction dust and demolition can distort results.
Try to keep the home in normal living mode. Use your usual HVAC settings and don’t do something unusual like leaving basement windows open every day “to help.” That isn’t your real baseline, and it won’t match how the finished basement will operate.
If your renovation requires major envelope changes, plan a second test after the work is complete. Tightening the home can change concentrations, so confirmation testing is part of a sensible plan.
Understanding Your Radon Result: What The Numbers Mean

Radon results are reported in Bq/m³ (becquerels per cubic metre). In Canada, the guideline is 200 Bq/m³, and Health Canada notes there is no level considered risk‑free.
Don’t treat the guideline like a cliff. Treat it like a decision line. Above it, you should plan corrective action. Below it, you may still choose to reduce exposure, but urgency drops.
Also remember the testing method matters. Long‑term results carry more weight than a quick reading. If you only have a short‑term number, treat it as information, not a verdict.
Under 200 Bq/m³: What To Do
If your long‑term result is under 200 Bq/m³, you typically don’t need mitigation right away. Keep the report and note where and when you tested. That documentation is useful later, especially if you sell the home or plan additional work.
That said, renovations can change radon levels. If you tighten the basement, add new exhaust fans, or change HVAC, it’s smart to retest after major upgrades. Think of it like a “before and after” check, not a one‑and‑done task.
You can also improve basement air quality in general with good ventilation and humidity control. If you want a broader basement air quality plan beyond radon, use our guide on managing humidity and airflow as a companion read.
200–600 Bq/m³: What To Do
If your long‑term result is above 200 Bq/m³, plan mitigation before you finish the basement. Health Canada’s guidance is straightforward: reduce levels when they exceed the guideline.
This is where timing saves money. If you install subfloor, drywall, and built‑ins first, you can block the best pipe routes and fan locations. You may also bury entry points like sump lids and slab joints behind finishes, which makes later work messy.
Treat this range as “solve it while the basement is open.” You’ll get a cleaner install and fewer compromises in layout.
Over 600 Bq/m³: What To Do
If your result is over 600 Bq/m³, prioritize mitigation before you invest in finishes. The good news is that the most common mitigation method is well‑understood and typically effective.
Don’t try to “ventilate your way out” of a high number as a permanent solution. You can lower exposure temporarily, but you want a system that reduces radon at the source and works year‑round.
If you’re already mid‑reno, pause long enough to plan the mitigation route. It’s still cheaper than completing a finished basement and reopening it later.
Mitigation Options That Actually Work In Existing Basements
Sealing helps, but sealing alone rarely solves radon. Most reliable mitigation strategies change the pressure relationship between the slab and the soil, then vent radon outdoors before it enters the home.
For homeowners, the goal isn’t to become a radon technician. The goal is to understand which options work, what they need from your basement layout, and why “do this first” matters during renovation planning.
If you want a local overview of radon basics, Toronto Public Health has a practical radon page that helps frame why testing and reduction matter.
Active Sub-Slab Depressurization
Active sub‑slab depressurization is the most common radon reduction method. Health Canada describes it as installing a pipe through the foundation floor and using a small fan to draw radon from below the house to the outside.
In renovation terms, this method benefits from access. You need a route for the pipe, a place to mount the fan, and a clean discharge path to the exterior. Those choices are easiest when framing and mechanical planning are still flexible.
This is also the option that tends to scale well. It can handle higher radon levels better than “spot fixes,” which is why it’s the workhorse approach in many existing homes.
Sealing Cracks And Penetrations
Sealing is still worth doing, but treat it as a supporting measure. When you seal slab cracks, control joints, and penetrations, you reduce easy entry paths. You also make depressurization systems work more efficiently because less soil gas leaks into the basement.
The mistake is believing sealing is a complete solution. Radon can still enter through tiny gaps you can’t practically seal. If someone promises “we’ll caulk it and you’ll be fine,” push for testing evidence and a real plan.
During renovation, sealing belongs early, before flooring and wall finishes hide the slab and perimeter.
Sump Pit Covers And Drain Seals
Sumps, floor drains, and perimeter drains can act like radon entry highways. An open sump lid is basically a direct connection to what’s under the slab. If you’re finishing a basement, leaving that detail unresolved is like finishing a room with a window that won’t close.
A proper sump cover detail can reduce radon entry and also support moisture control. It’s one of those win‑wins that belongs in your pre‑finish scope. If your basement already has moisture management systems, coordinate radon details so you don’t break the drainage function while sealing.
This is also where floor planning matters. If your sump is buried under future built‑ins, servicing becomes painful. Plan access panels and routes while the basement is still open.
Ventilation Adjustments
Ventilation can help dilute indoor radon, but it’s usually supplemental rather than the primary fix for elevated results. It can also create pressure changes that unintentionally pull more soil gas in, depending on how the system is set up.
That’s why ventilation belongs in a broader “basement air strategy.” If you’re already thinking about comfort, humidity, and stale air, use this as a companion resource and keep radon in the conversation.
In practice, you want balanced decisions. You want a basement that’s comfortable and efficient without creating hidden pressure problems.
Retesting After Mitigation
Retesting is non‑negotiable. You’re not guessing whether the system worked, you’re verifying. Health Canada emphasizes testing and reduction guidance because the only way to know your radon level is to measure it.
Retesting also gives you documentation you can keep with your renovation records. That matters for resale and for your own confidence that you made the right call before investing in finishes.
If results are still higher than expected, adjustments are easier when the basement is not fully closed in. Another reason to do this before drywall.
At‑A‑Glance Table: Radon Mitigation Options Compared
| Option | Best For | Watch‑Outs |
| Active Sub‑Slab Depressurization | Most homes above guideline, especially when finishing a basement | Needs a clean pipe route, fan location, and exterior discharge planning |
| Sealing Cracks And Penetrations | Supporting measure in any plan | Rarely sufficient on its own for elevated results |
| Sump Pit Covers And Drain Seals | Basements with sumps, floor drains, perimeter drains | Must preserve drainage function and allow future access |
| Ventilation Adjustments | Supplemental support for overall air quality | Pressure changes can complicate radon if not planned carefully |
Renovation Sequencing: Where Radon Fits In A Basement Build
Radon isn’t a “later” item. It’s a pre‑finish item, like slab prep and moisture management. The best basement renovations run in a sequence that protects access until critical systems are confirmed.
If you want to see the full sequence of a basement finishing project, including permit and inspection checkpoints, use our step‑by‑step basement process guide as the bigger roadmap.
The four steps below show where radon work fits without derailing the rest of your build. Follow them and you avoid the classic trap of finishing first and fixing later.
Step 1: Test Before You Finalize Layout And Flooring
Test before you lock the layout because mitigation can influence routing. Pipe paths, fan locations, and sump access sometimes affect where you place storage rooms, bathrooms, and built‑ins. It’s easier to shift a plan line than to shift a finished wall.
Testing early also protects your budget. If you need mitigation, you can price it and schedule it like any other scope item, instead of treating it like an emergency change order.
If you’re planning a basement bedroom, home office, or rental suite, treat testing as part of “making the space livable,” not just part of renovation paperwork.
Step 2: Mitigate Before Subfloor, Drywall, And Built‑Ins
Mitigate while the slab is accessible. Once subfloor and framing go in, you lose clean access to the slab perimeter and you limit routing options. Once drywall and built‑ins go up, adjustments get messy and expensive.
This matters for flooring strategy too. Many subfloor systems cover the slab and create a clean finished feel, but they also make later radon work harder if you need to open sections. Plan radon first, then build your floor system.
In short: solve air and slab issues before you invest in comfort finishes.
Step 3: Coordinate With Mechanical And Electrical Early
Radon mitigation is not a standalone island. Fans need power, pipe routes need coordination with ducts, and discharge paths need planning so you don’t clash with windows, decks, or future exterior work.
This is where design-first planning earns its keep. When mechanical, electrical, and framing are coordinated early, the radon system can be tidy and unobtrusive. When they’re not, you get odd bulkheads and awkward routing that homeowners notice forever.
If you’re unsure whether your scope also triggers permits, it’s better to confirm early and build the schedule around that reality. Our basement renovation permit guide explains common basement permit triggers in plain language.
Step 4: Retest And Document Results Before Closing The Project
Once mitigation is installed, retest and keep the result with your renovation records. That’s your proof that the system is doing its job, and it makes future decisions easier if you renovate again.
Documentation also helps with resale. Buyers increasingly ask about radon, especially in finished basements. Having a clear “tested and addressed” record reduces friction later.
Close out the project only after the air story is complete. It’s the same mindset as a final inspection, but for indoor air risk.
Common Mistakes To Avoid (And What We Recommend Instead)
Most radon mistakes happen because people treat it like a paint colour decision. It isn’t. It’s a timing decision. The wrong timing turns a manageable scope item into a disruptive retrofit.
Use the mistakes below as a checklist when you talk to contractors. If their plan ignores these points, you’re likely to pay more later.
Testing After The Basement Is Finished
Testing after the basement is finished often leads to regret. If results come back high, mitigation may require opening floors, cutting drywall, or rerouting systems around built‑ins. That’s expensive, dusty, and avoidable.
Testing first is the better move. It keeps options open and lets you design mitigation into the project instead of bolting it on.
If you already finished the basement, still test. But be ready for the possibility that solving it may be more invasive than it needed to be.
Relying On A Quick Reading Or A Gadget
A quick reading feels comforting because it gives you a number fast. But radon varies, and short snapshots can mislead you. Health Canada stresses long‑term testing for a minimum of 3 months for a reliable result.
If you want a quick tool for curiosity, fine. But don’t make renovation decisions based on curiosity data. Make them based on long‑term measurements.
When money and finishes are on the line, “fast” is rarely “smart.”
Treating Sealing As Full Mitigation
Sealing is helpful, but sealing alone is usually not a complete mitigation strategy for elevated levels. It’s hard to seal every microscopic pathway, and pressure differences can still pull soil gas in.
Treat sealing as a support step. Pair it with a real reduction method when levels exceed the guideline. Health Canada points homeowners to mitigation approaches that reduce radon, with sub‑slab depressurization as the most common method.
If someone sells “caulk-only radon mitigation,” ask how they’ll prove it worked. Then insist on retesting.
Skipping Post‑Mitigation Retesting
Skipping retesting is like skipping the final inspection. You might feel done, but you don’t actually know the outcome. Retesting confirms whether the system achieved the goal and whether adjustments are needed.
It also gives you a record. That record matters later, especially if you sell or renovate again.
If a contractor is vague about retesting, that’s a process red flag. Good work comes with verification.
Forgetting That Renovation Changes Can Shift Radon Levels
Renovations can make a home tighter. That can change radon concentrations, even if the pre‑reno result was acceptable. Treat radon like something you recheck after major changes, especially when you add insulation, air sealing, or new mechanical systems.
This is where pairing radon planning with broader basement air planning helps. A basement that manages humidity and ventilation well tends to be easier to live in overall.
Retesting after major upgrades is a small step that protects a big investment.
Renovating Your Basement, The Right Way
Radon is one of the few basement risks that’s easiest to solve before you renovate. A simple test can tell you whether you need mitigation, and doing that work early protects your finishes, your budget, and your schedule.
If you’re planning a finished basement in the GTA, we can help you sequence the project properly. We use a transparent pricing contract model and a detailed build schedule you can track, and we’ve been family owned since 2010. If you want to start with a clear plan, talk to our basement renovation contractors.
FAQs
Yes, testing before finishing is the smart move. It gives you baseline data while the slab, sump, and perimeter are still accessible. If mitigation is needed, it’s easier, cleaner, and less disruptive before framing and drywall.
Health Canada recommends a long‑term test for a minimum of 3 months. That duration matters because radon fluctuates. A long‑term test gives you an average you can trust. If you’re making renovation decisions, avoid relying on short snapshots.
Place it in the lowest level of the home that you occupy, at breathing height, away from drafts and direct airflow. If you’re finishing the basement for living space, that typically means the basement itself. Toronto Public Health’s radon resource is a helpful local reference for why basements are a common focus and why testing matters.
Health Canada’s guideline is 200 Bq/m³, and it notes there is no risk‑free level. If your long‑term average exceeds 200 Bq/m³, plan to reduce it, especially before finishing a basement. The higher the number, the more urgent it becomes to act.
Sometimes sealing reduces radon, but it’s rarely reliable as a standalone fix for elevated levels. It’s difficult to seal every pathway, and pressure differences can still draw soil gas in. Use sealing as a supporting step, not the whole plan. Health Canada describes sub‑slab depressurization as the most common radon reduction method because it targets the source under the slab.
Yes. Retesting confirms the mitigation worked and gives you documentation for your records. It’s also smart to retest after major renovations that change airtightness or ventilation, because those changes can affect concentrations. Testing is the only way to know your level. Health Canada’s testing guidance is clear on measurement as the basis for decisions.
A dehumidifier helps manage moisture, and an air purifier can help with particles, but neither is a targeted radon mitigation method. Radon is a gas that enters from below, so effective mitigation focuses on reducing entry and venting radon outdoors. If you’re improving basement comfort overall, pair humidity control with proper ventilation and, when needed, a radon reduction system. That combination protects both comfort and indoor air quality.
Check out more posts below...
Why Older Newmarket Basements Often Need Underpinning

What Newmarket Requires To Register A Basement Suite

Basement HVAC Basics: Return Air, Zoning, And Year-Round Comfort
Behind The Walls Of A Newmarket Basement Renovation
Asbestos And Lead In Older Basements: What To Check Before You Renovate